
The ultimate print ready checklist


Are you ready to take your design from the digital world onto a physical object?
You’ve come to the right place.
This Print Ready Checklist will help make sure all your bases are covered when it comes to preparing your design for printing stickers and labels.
But don't worry if this gets confusing or you haven’t got the time. If you place an order with us, our designers will make your design print ready for you.
We'll send you a digital proof for approval so you can double-check it looks perfect.
But let’s quickly look at what we mean by ‘making something print ready’ and the benefits.
What does Print Ready mean?
Getting artwork Print Ready is a process of taking a design that looks amazing on the screen to being correctly prepared for manufacturing by a printer, so it prints as expected.
The benefits of submitting print-ready artwork are:
- It’ll speed up the proofing process when ordering
- You can control the details, such as the exact shape of a cutline
- You’ll ultimately get your order quicker
Now let's dive into what it takes to make a design ready for printing:
Create a cutline
Creating a cutline can be very simple if you'd like a square or circle. However, it can get complicated if you'd like a custom shape.
The cutline is essential as it will determine the shape of your sticker or label. Definitely, something to get it right.
If you don't want to add your own cutline, we can do it for you. Simply add a note when uploading your artwork. I’ll show you how to do that later.
If you don't know how to create a cutline, you can find a tutorial on how to create a custom cut line here.
Add a 2mm bleed
Bleeds refer to the area of the artwork that will be trimmed off during the printing process.
We print beyond the cutline so you get beautiful clean edges with a design printed right up to it. That's how we create stickers that look like this:

To add a bleed, extend your artwork 2mm beyond the cutline to account for any slight variations in the cutting process.
Don't know how to add a bleed? Then you can learn how to add a bleed here.
Add a 2mm safe zone
The 2mm safe zone is the area of your artwork that is guaranteed to be visible in the final print.
It looks like this:

It helps to avoid important information being cut off during the cutting process.
Safe zones are traditionally used in paper printing of business cards & flyers, and date back to the days in which cutting was a manual process and not very accurate.
Nowadays, we cut your stickers and labels with digital machines, which are incredibly accurate so safe zones are less important than they used to be.
However, let’s stick with the lessons safe zones have taught us: try to avoid placing important information right on the edge of your sticker or label.
Instead, keep important elements, such as text and logos, at least 2mm away from the cutline.
Convert fonts to outlines (vector designs only)
When designing in vector, using a program such as Illustrator or CorelDRAW, any text in your design will stay editable.
This is great for iterating your design.
However, there are 2 issues:
- Not every printer has the same fonts installed as you do
- A printer can change the font without telling you
To avoid problems, convert the text to vector shapes so they cannot be edited. This means nothing will change when you share your artwork. We show you how to convert your text to outlines here.
Link files (for Adobe only)
When you are designing in Adobe Illustrator or Photoshop it link images & other assets as external files.
What that means is when you share the original Adobe file (such as .ai or .psd), you need to make sure you include linked files when exporting.
You can easily do that by selecting this option here:

This will create a bigger file that contains the images and anything else that you have included in your design. That way nothing will get lost when your send the file to others.
Use CMYK instead of RGB colours
There are two main colour models used in printing: RGB (Red, Green, Blue) and CMYK (Cyan, Magenta, Yellow, Black).
RGB is used for screen displays, while CMYK is used for printing. This means that what you see on your screen can differ from the printed result. To avoid this, make sure to use CMYK when creating your artwork for printing.
Converting your colours to CMYK is crucial because there are 16,000,000 RGB colours & only 16,000 CMYK colours (quite a lot less)!
This image shows how the colour model can change the colours in an image:
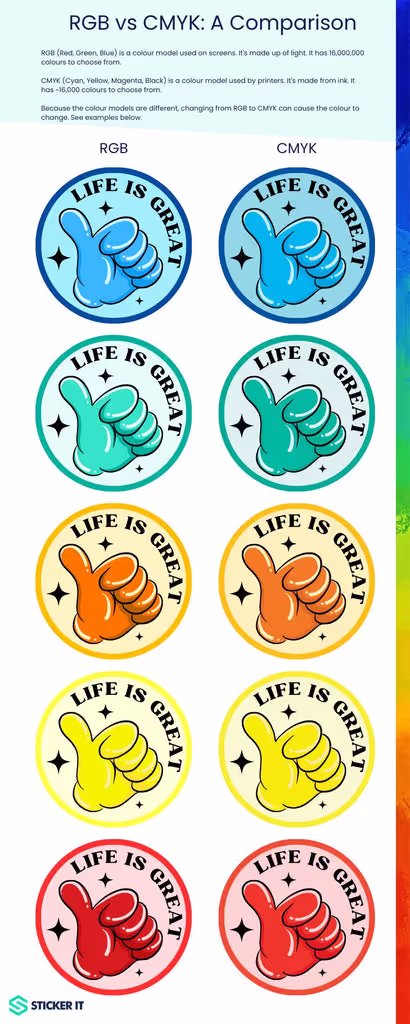
To give your design the best chance of being printed in the same colour as you designed it, use CMYK colours.
Want to know more about CMYK vs RGB? Then read our detailed blog.
Determine the final print size
It sounds trivial but we often find that sizing is one of the biggest issues, so don't skip this part.
Setting your design to its final size will also determine the resolution of your artwork.
A very simple, quick way of knowing that your sticker label is the right size is to simply print it on your home printer and cut it out. It's very crude but especially for product labels where your design needs to fit a certain space, this little trick can be very effective.
Yes, finding the right size for your stickers and labels is crucial. But it is just as important to give your design enough room and not choose a size that is too small.
It is very easy to lose sight of the actual size of your design when designing on your computer. So make sure you view the design at a 1:1 scale not highly zoomed in. You want to check you can read the text and that the design stands out when a real scale.
The example below shows a 20mm circle sticker that include way too much detail and doesn't look very good when printed. However, as you can see it looked grear hyper-zoomed in during the design phase.

Choose the right file format
There are two main types of files; bitmap and vector.
For printing purposes, it's recommended to use vector graphics rather than bitmap graphics.
If you don't know what these are don't worry - we'll explain.
Vector graphics are made up of lines and curves, and can be scaled up or down without losing quality.
Bitmap (a.k.a raster) images are made up of pixels and can become blurry when scaled up.
This image shows the difference when scaling:
Use the correct resolution - 300DPI+
If you do have bitmap artwork the resolution should be at least 300 dpi (dots per inch) for the best printing results. Lower resolutions may result in a pixelated or blurry print.
As a rule of thumb, the higher the better.
For vector artwork, you don't have to worry about the resolution. It can scale indefinitely.
Double-check artwork
Before submitting your artwork for printing, it's important to review it thoroughly to make sure that there are no mistakes or errors. Check for spelling mistakes, incorrect colours, and missing elements.
Export your file in the correct format
- Vector files: Save as a PDF
- Bitmap files: Save as a JPG.
The two file formats mentioned above are our preferred formats.
PDFs are great because they bundle everything up and make it easy to transfer.
However, you can upload almost file type.
Just remember to link files if you're sending it an original Adobe file. Or, if you're working with bitmap files, to export at a high resolution (300DPI+).
Include special instructions
If there's anything that you've struggled with from the points above don't worry we can do it for you.
All you need to do is to add some instructions when uploading your artwork.
You can do this in the Cart. Simply enter them in the box shown in the middle of the page.

For example, if you struggled to create a custom cutline we will do it for you please just let us know.
To conclude
Preparing your artwork for printing requires attention to detail, and after reading this, it might seem like quite the challenge, but it is actually simple.
You do not need to have a detailed understanding of the printing process. You can follow the points above and get a perfect outcome.
If, however, you don't have the time or motivation to make your artwork print-ready, we can do it for you when placing an order.
Simply upload your artwork and add any instructions you'd like us to follow.
Subscribe to our newsletter
Enter your email below to stay up to date on Sticker it's latest, including new product launches, exclusive deals and more.